KUSANAGI plug-ins
KUSANAGI plug-ins are bundled with KUSANAGI and ready to use. The plug-ins include accelerating features such as Page Cache and Translate Accelerator, as well as a theme switching feature.
Feature Summary
Page Caching
Page Caching temporarily saves HTML display data and reuses it to speed up the loading time of the page.
Performance Display
The execution speed of WordPress and the number of queries appear on the control bar. The background color will change depending on the number. You can switch the plug-in on and off from the settings screen.
Device Switching
Device Switching can change the display theme according to different mobile devices, such as smartphones and tablets, to optimize the display. Even with the cache function enabled, this plug-in can switch themes correctly for each device.
Translation Accelerator
Translation Accelerator can disable the translation of WordPress, plug-ins and themes that support multiple languages, or cache the translation data. This plug-in accelerates the loading of translation data and reduces loading time of pages.
How to use KUSANAGI plug-ins
Click KUSANAGI from the menu on management screen to show “KUSANAGI Settings”. You can configure each plug-in from this screen.
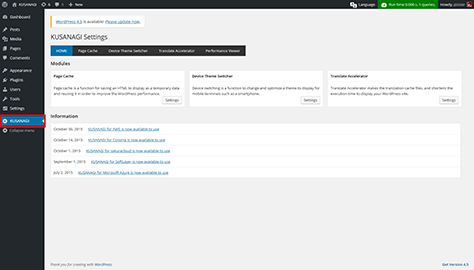
KUSANAGI Settings
Page Caching settings
Page Caching is disabled by default.
Log in to the virtual machine via SSH, switch to root user, and run the following command to enable cache.
# kusanagi bcache on
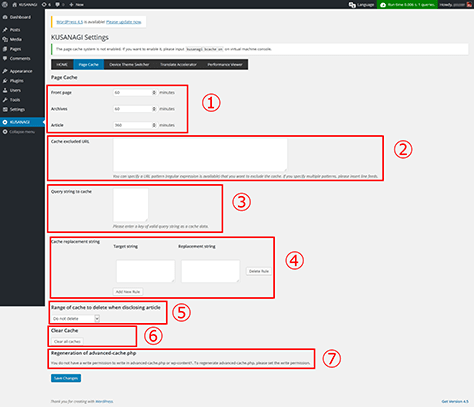
Page Cache
- Cache expiration time
You can set cache expiration time separately for front page, archives, and articles. - Cache URL exceptions
You can specify URLs that you wish to exclude from caching.
Cache is disabled below wp-admin directory by default. - Query string to cache
You can specify query strings that cache is enabled.
WordPress default queries have already been specified in advance, so you don’t have to register them here. - Cache to delete when publishing an article
You can set the scope of cache to be removed at the same time of publishing an article. For example, it is effective when you want to post the latest article on the front page. - Clear cache
You can delete all the cache generated.
Please note that for high traffic websites, server load may increase temporarily after the cache is cleared. - Restoration of advanced-cache.php
Make sure to click this button to perform the restoration if you want to change the cache starting time or any cache settings listed above in 1 to 4. - Save the changes.
Performance Display settings
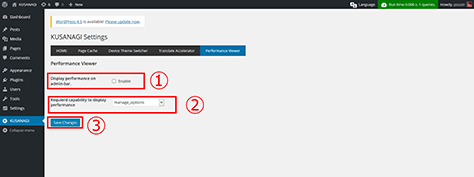
Performance Viewer
- Disable or enable the performance display.
- Select the capability authorization for displaying performance.
- Save the changes.
Device Switching settings
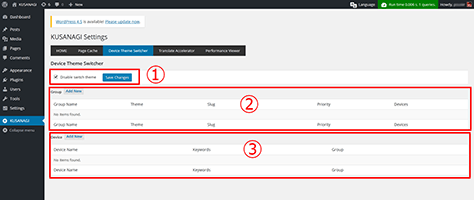
Device Theme Switcher
- Stop switching themes for different devices
Check or uncheck the box to enable or disable device switching. It is disabled by default. - Group
Specify the theme for each device.
By default, smartphone and tablet are registered. You can configure “Themes to be used for smartphone access” and “Themes to be used for tablet access”. - Device
Specify the group for each device.
In most case, you don’t have to change the group because the value is set for most general devices by default.
Translation Accelerator settings
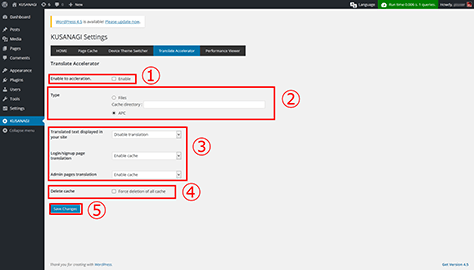
Translate Accelerator
- Enable acceleration
Enable or disable the Translation Accelerator. - Type
Configure the type of cache. The type is set as APC by default and in most cases you don’t have to change it. - Acceleration setting for each screen
You can perform settings for “Translated text to display”, “Login/signup page translation”, and “Admin page translation”.
By default, “Disable translation” is set for “Translated text displayed in your site”, and “Enable cache” for others.
If you use themes that don’t have translation, then you don’t need to make any changes. - Delete cache
This clears the cache. If you have changed cache settings, please check the box and click “Save Changes”. - Save the changes