Notable features
- Install KUSANAGI without depending on the OS
- Easily set up KUSANAGI environment
- Set up KUSANAGI on a local PC
- Focus on development/verification without worrying about affecting other developers
Install outline
- Install VirtualBox
- Install Vagrant
- Install the KUSANAGI Vagrant Box
*This guide was written for Windows, but can also be used for MacOS and others
The following conditions will cause the installation to fail
- The host PC’s CPU does not support hardware-assisted virtualization. PC’s built after 2008 typically do, however it is commonly disabled in the BIOS. Confirm that VT is not set to ‘Disable’ in the BIOS settings. Some older PC’s may not have hardware-assisted virtualization at all, in which case you would need to switch to a newer PC that does.
- The username includes Japanese characters (on Windows). Create an account using only alphabet characters and try running
vagrant up - Vagrant Box files take some time to download during the first
vagrant up. Without enough bandwidth, there is a good chance that the download will fail, so be sure to use a connection with sufficient bandwidth. - Security settings in Mac OS High Sierra and later will block VirtualBox by default. Check System Preference -> Security&Privacy settings If Oracle America, Inc. is blocked, so allow it.
Installing VirtualBox
- Download VirtualBox for Windows from: http://www.oracle.com/technetwork/server-storage/virtualbox/downloads/index.html
- Double-click on the downloaded file to start the installer. Click OK throughout installation.
- After installation, this icon will appear:

Installing Vagrant
- Download Vagrant for Windows(64bit) from: https://www.vagrantup.com/downloads.html
- Double-click the downloaded file to start the installer, and click OK throughout the installation.
- Restart your PC.
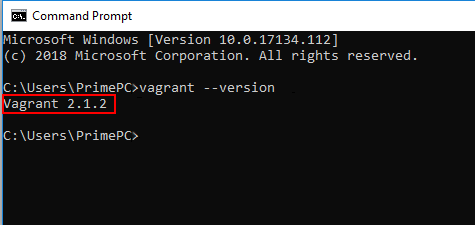
- After installation, run
vagrant --versionfrom the command prompt and the following version information will be displayed.
Installing the KUSANAGI Vagrant Box
Launch the command prompt:
Execute the following commands:
mkdir kusanagi(Create a directory with name of your choice, i which the Vagrantfile will be created)cd kusanagi(Move to the new directory)vagrant init primestrategy/kusanagi(Create Vagrantfile)
Leave the command prompt open.
Edit the Vagrantfile
Open the Vagrantfile in an editor and make the changes below.
This allows you to set the SSH connection port, and enable communication between the host OS and guest OS.
1. To modify the vagrantfile.
Before:
# config.vm.network "private_network", ip: "192.168.33.10"
After:
config.vm.network "private_network", ip: "192.168.33.10"
config.vm.provider "virtualbox" do |vb|
  vb.customize ["modifyvm", :id, "--memory", "1024"]
end
*This configuration sets the memory to “1024”. To increase the memory setting, please confirming the memory capacity in your computer.
2. Save the Vagrantfile.
Launch the virtual machine
Execute vagrant up from the command prompt. If there is a problem, make sure that your current directory is the same directory as the one that the Vargrantfile is in.
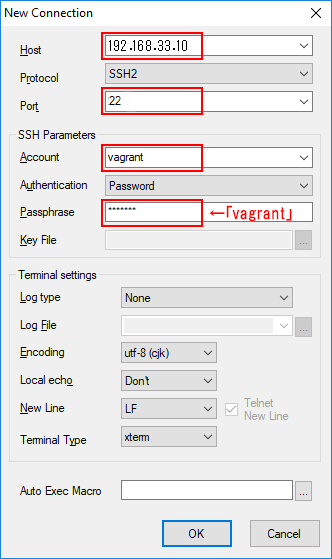
Once the virtual machine has launched, use an SSH client to log in as a guest with the following info:
Port number: 22
User name: vagrant
Password: vagrant
KUSANAGI initialization and provisioning
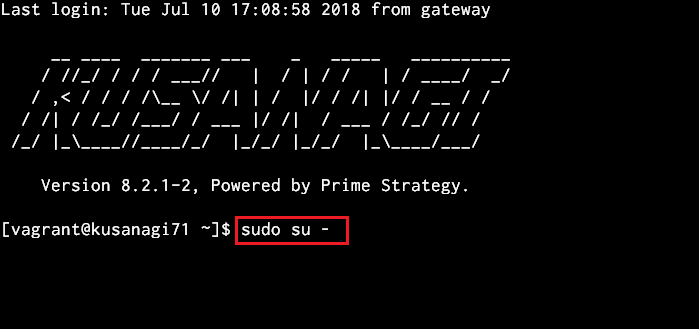
After successfully logging in, the screen below will be displayed.
You are logged is as a ‘vagrant’ user right after SSH login, so use $ sudo su - to switch to ‘root’ user.
Read the following document for the initialization procedure:
After running kusanagi provision as in the instructions above, adding the following code to the hosts file on the host OS(Windows) will allow you to view a KUSANAGI site built on the guest OS from a browser on the host OS.
192.168.33.10 {FQDN name set during kusanagi provisioning}
*Microsoft Edge isn’t able to access FQDN that you set up on provisioning. Please use another browser to access. Reference: Edge not displaying sites hosted in vagrant