This is a series of articles explaining how to speed up WordPress, the use of which is growing rapidly for CMS-based business sites and media sites. In the next few articles, I will offer techniques to tune WordPress’ speed by 1000x. --Kengyu Nakamura, Prime Strategy Co., Ltd.
In the previous article, we installed the PHP-compatible HHVM (HipHop Virtual Machine), and sped up WordPress 16.9x the default environment.
In this article, we are going to continue tuning by switching the web server from Apache to the lightweight high speed Nginx.
This technique continues from previous tuning, so please refer to earlier articles to get to this point.
Install Nginx
Nginx is a lightweight high speed web server developed in Russia. Nginx can also be used for reverse proxies and load balancing, but its strongest features are the reverse proxy cache and FastCGI cache. We will be installing it as a replacement for Apache.
First, create the repository for Nginx. Save the following code as "/etc/yum.repos.d/nginx.repo". This is needed to install the latest version.
[nginx]
name=nginx repo
baseurl=http://nginx.org/packages/mainline/centos/7/$basearch/
gpgcheck=0
enabled=1
Install Nginx and confirm the version number.
[root@ip ~]# yum install nginx -y
As of April 2016, Nginx's latest version is 1.9.13. You can confirm this with the following command.
[root@ip ~]# nginx -v
nginx version: nginx/1.9.13
built by gcc 4.8.5 20150623 (Red Hat 4.8.5-4) (GCC)
built with OpenSSL 1.0.1e-fips 11 Feb 2013
TLS SNI support enabled
(omitted)
Change the web server from Apache to Nginx.
[root@ip ~]# systemctl disable httpd
[root@ip ~]# systemctl stop httpd
[root@ip ~]# systemctl enable nginx
[root@ip ~]# systemctl start nginx
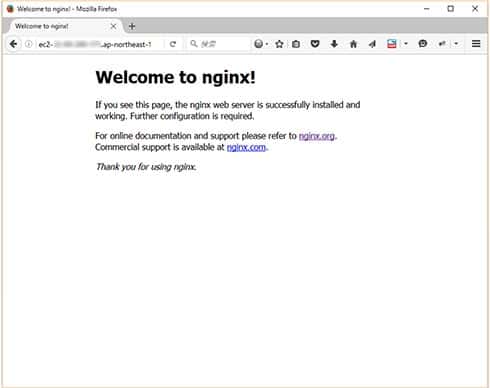
If you reload the front page in your browser, you should be greeted with the Nginx welcome screen if everything is working correctly.
Next, we will change the settings so that WordPress will be loaded. Edit "/etc/nginx/nginx.conf" in the following manner:
1. (omitted)
2. http {
3.     include       /etc/nginx/mime.types;
4.     default_type  application/octet-stream;
5.     log_format  main  '$remote_addr - $remote_user [$time_local] "$request" '
6.                       '$status $body_bytes_sent "$http_referer" '
7.                       '"$http_user_agent" "$http_x_forwarded_for"';
8.     access_log  /var/log/nginx/access.log  main;
9.     sendfile        on;
10.      #tcp_nopush     on;
11.      keepalive_timeout  3;
12.      gzip  on;
13.      server_names_hash_bucket_size 128;
14.      include /etc/nginx/conf.d/*.conf;
15.  }
[Lines 11-13 are modified]
Change the keepalive_timeout and enable gzip. By making the server_names_hash_bucket_size larger you can guarantee that a long host name will not cause problems for virtual host.